At its core, a lemon tart relies on a few key ingredients. You will need all-purpose flour, butter, and sugar to form the crisp shortbread crust. The rich, smooth filling is created from a simple combination of fresh lemon juice, eggs, and sugar, which work together to produce the tart’s signature zesty custard.
Table of Contents
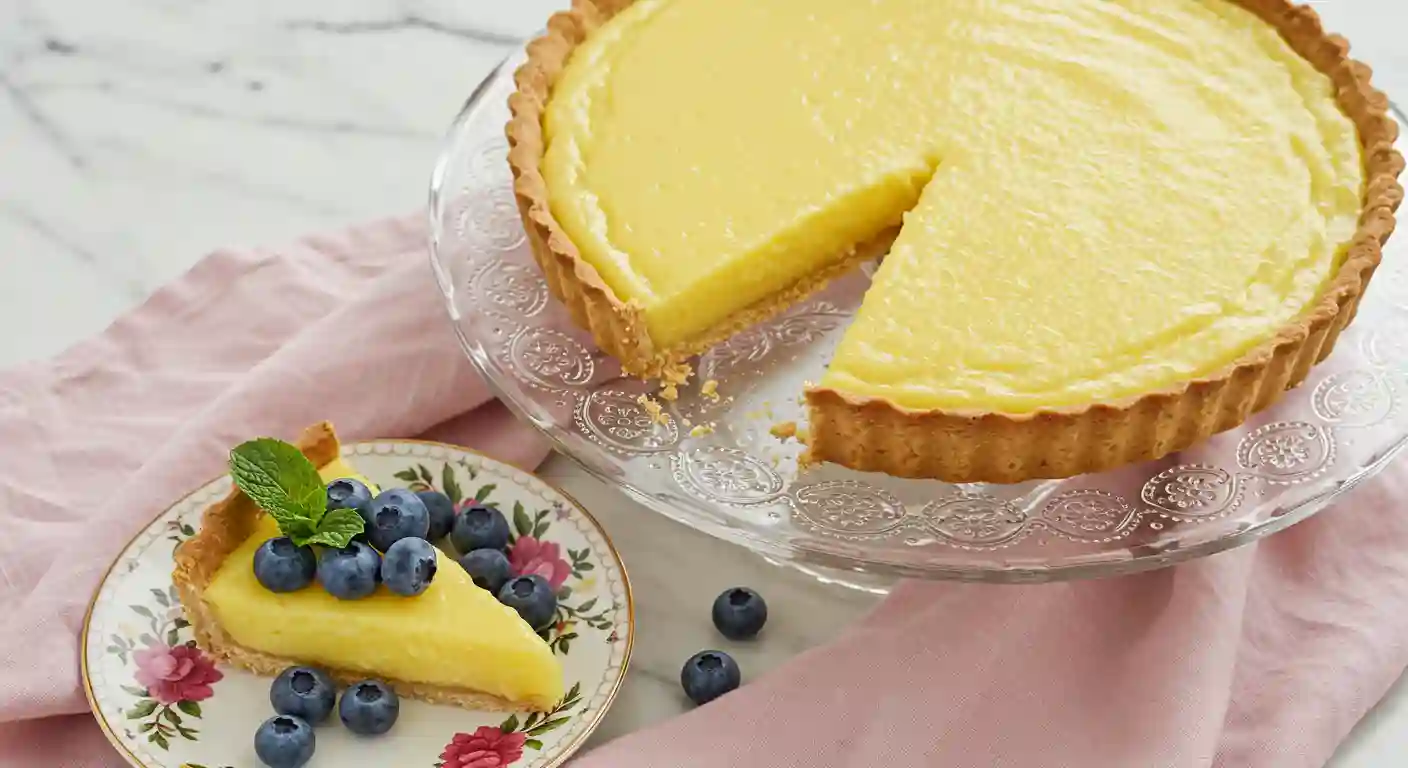
Classic Lemon Tart
Ingredients
Equipment
Method
- Prepare the Crust: In a large bowl, whisk the flour, sugar, and salt. Add the cold, cubed butter and work it in with a pastry cutter or your fingertips until the mixture resembles coarse crumbs. In a small bowl, whisk the egg yolk and cream, then drizzle into the flour mixture, tossing with a fork until the dough clumps together. Press into a disk, wrap in plastic, and chill for 1 hour.
- Shape and Blind Bake: Preheat oven to 375°F (190°C). Roll the chilled dough out and press it into a 9-inch tart pan with a removable bottom. Pierce the base with a fork and freeze for 30 minutes. Line the frozen crust with parchment paper, fill with pie weights, and bake for 20 minutes until lightly golden.
- Make the Filling: While the crust bakes, whisk the eggs and yolks in a medium bowl and set aside. In a saucepan, combine the sugar, lemon juice, zest, and butter over medium heat. Stir until the butter melts and the mixture just begins to bubble.
- Temper and Thicken: Remove the pan from the heat. Very slowly, drizzle the hot lemon mixture into the eggs while whisking constantly. Pour everything back into the saucepan and cook over low heat, whisking until the curd thickens and coats the back of a spoon (about 170°F).
- Assemble and Final Bake: Strain the curd into a clean bowl. Reduce oven temperature to 350°F (175°C). Pour the warm filling into the pre-baked tart shell and bake for 10 minutes, just until the edges are set but the center still wobbles slightly.
- Chill and Serve: Let the tart cool completely at room temperature, then refrigerate for at least 2 hours to fully set before slicing and serving.
Notes
2 Secrets to a Flawless Lemon Tart
Before we dive in, let’s focus on the two moments that make or break a lemon tart. Mastering these guarantees a spectacular result.
The first secret is for the filling. To get that incredibly smooth texture, you need to handle the eggs with care. We do this by slowly streaming the hot lemon mixture into the beaten eggs while whisking non stop. This technique, known as tempering, gently raises the temperature of the eggs so they combine into a silky curd instead of turning into scrambled eggs.
The second secret is knowing exactly when to pull the tart from the oven. A cracked filling is a common sign of overbaking. To avoid this, look for the perfect wobble. The edges of the tart should be set, but the very center should still have a slight jiggle to it when you gently nudge the pan. The lemon tart will continue to set as it cools on your counter, resulting in that perfect, soft custard texture.
Ingredients
For the Buttery Tart Crust:
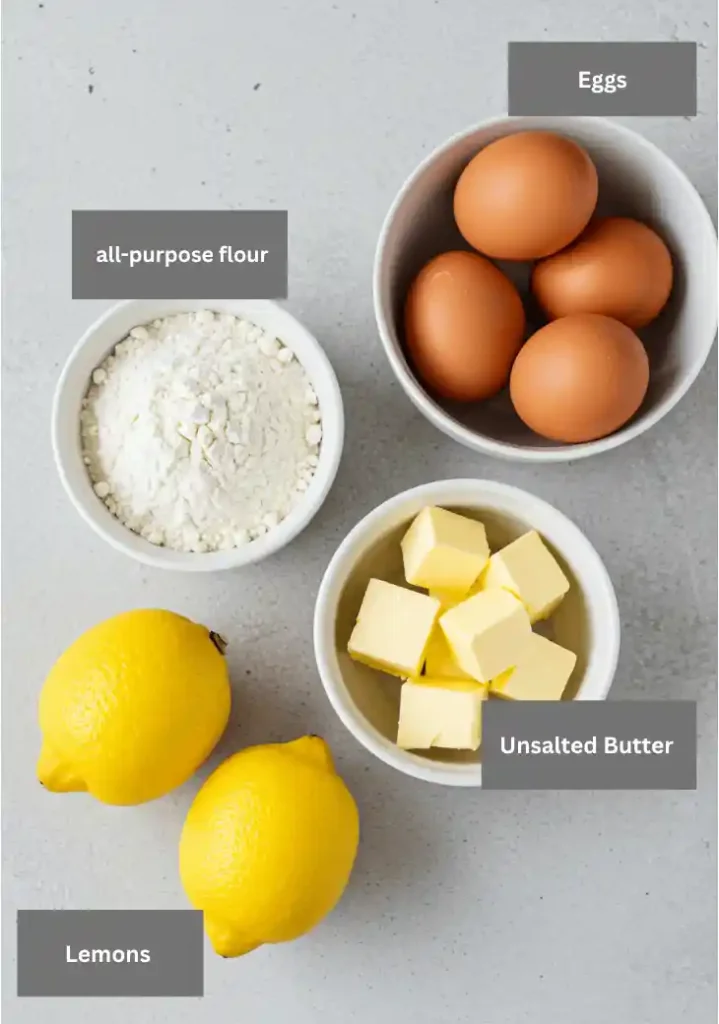
- 1 ¼ cups All-Purpose Flour (150g)
- ¼ cup Granulated Sugar (50g)
- ¼ tsp Salt
- ½ cup Cold Unsalted Butter, cut into small cubes (113g)
- 1 Large Egg Yolk
- 2 tbsp Heavy Cream (10ml)
For the Silky Lemon Filling:
- 4 Large Eggs
- 2 Large Egg Yolks
- 1 cup Granulated Sugar (200g)
- ½ cup Fresh Lemon Juice (2-3 lemons)
- 2 tbsp Lemon Zest (use unwaxed, organic lemons if possible)
- ½ cup Unsalted Butter, cut into pieces (113g)
Equipment
- A 9 to 10-inch fluted tart pan with a removable base for easy release.
Method Steps
Part 1: Prepare the All-Butter Tart Crust
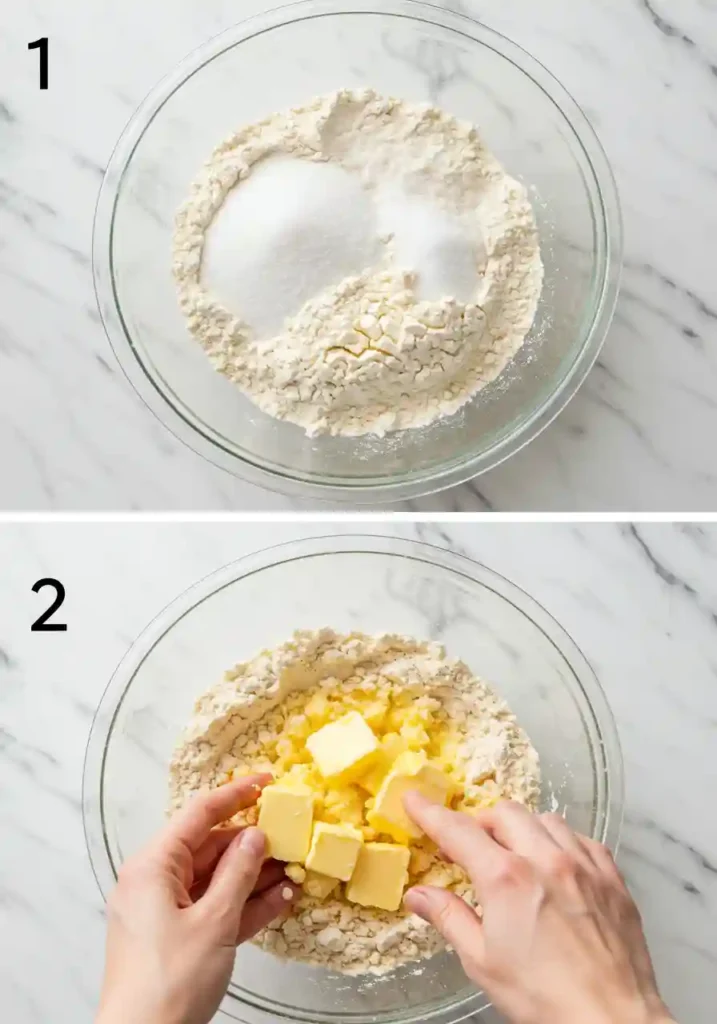
- Create the Flour Base: In a large bowl, aerate the flour, sugar, and salt with a whisk until uniform.
- Cut in the Butter: Add the cold, cubed butter. Using a pastry cutter or your fingertips, work the butter into the flour until it resembles coarse crumbs with some pea-sized butter bits still visible.
- Form the Dough: In a small bowl, whisk the egg yolk and cream. Drizzle this over the flour mixture and toss with a fork until the dough begins to clump together. Form the dough into a thick puck, seal it in plastic wrap, and let it chill for at least 1 hour to allow the butter to firm up.
- Line the Pan: On a floured surface, roll the dough into a circle larger than your pan. Drape it over the pan, gently easing it into the base and up the fluted sides. Use a rolling pin or knife to trim the excess for a clean edge.
- Dock the Crust: To prevent the base from puffing up in the oven, prick it all over with a fork. Freeze the tart shell for half an hour.
- Blind Bake: Preheat your oven to 375°F (190°C). Line the frozen crust with parchment paper, fill with pie weights or dried beans, and bake for 20 minutes. Look for the rim to be set and kissed with a pale golden color.
Part 2: Make the Vibrant Lemon Filling
(While the crust bakes, start the filling. Once the crust is baked, lower the oven temperature to 350°F (175°C) to prepare for the final bake.)
- Prep the Components: In a medium bowl, whisk the 4 eggs and 2 yolks together until smooth; set aside.
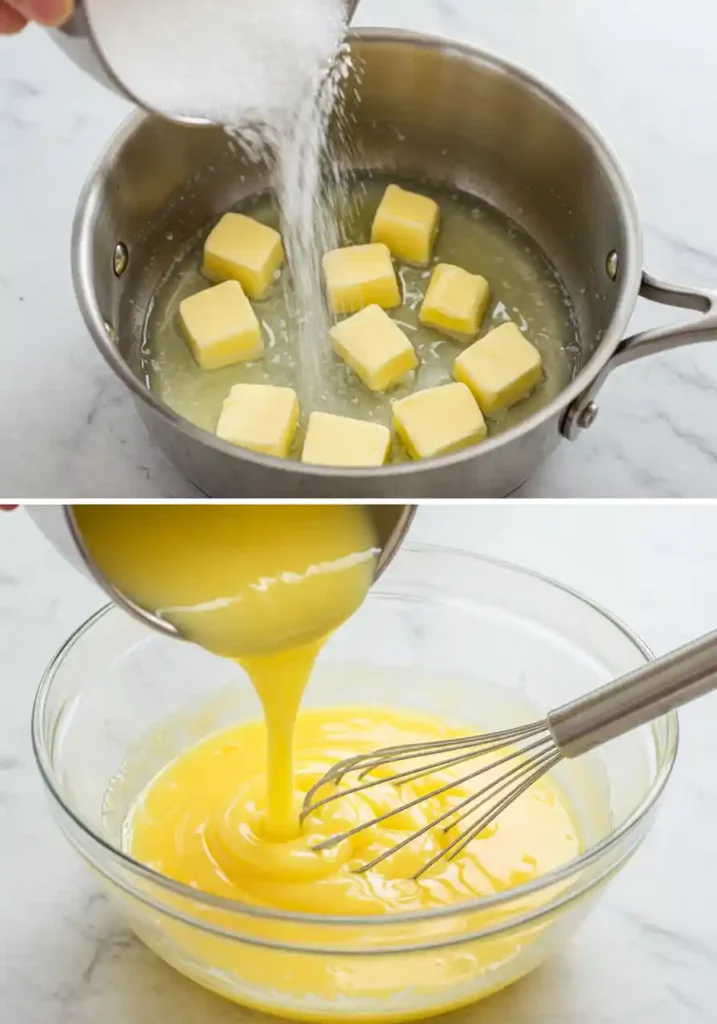
- Begin the Filling: In a medium saucepan, combine the sugar, lemon juice, lemon zest, and butter. Place over medium heat, stirring frequently until the butter melts and the mixture just begins to bubble at the edges.
- Temper the Eggs: Remove the saucepan from the heat. Very slowly, drizzle the hot lemon mixture into the beaten eggs while whisking constantly and vigorously to prevent scrambling.
- Thicken the Curd: Pour the entire mixture back into the saucepan and return to low heat. Stirring non-stop, cook until the curd thickens enough to sheathe the back of a spoon (about 3-5 minutes, or 170°F).
- Strain for Smoothness: For the silkiest possible texture, strain the finished curd through a fine-mesh sieve into a clean bowl. Lay plastic wrap directly onto the curd’s surface, ensuring it makes full contact to prevent a skin from forming as it cools.
Part 3: Assemble and Final Bake
- Fill the Tart: Pour the warm lemon filling into your pre-baked tart crust and smooth the top.
- Set the Filling: Bake at 350°F (175°C) for 10 minutes. The goal is only to set the edges; the center should still have a slight wobble. Do not overbake.
- Set the Tart: For perfect, clean slices, let the tart cool completely on the counter, then chill in the refrigerator for a minimum of 2 hours.
Storage and Serving:
- To Store: The lemon tart will keep well covered in the refrigerator for 3-4 days.
- Freezer Option: The tart freezes beautifully. Wrap well and store whole or by the slice for up to 1 month.
- To Serve: Delicious on its own, or with a dollop of whipped cream and fresh berries.
Avoid These Common Pitfalls in Making Tart
Making a tart from scratch is rewarding, but a few common issues can pop up. Here is how to navigate them for a perfect result.
Soggy Bottom
A great tart begins with a crisp, buttery crust. A soggy bottom can ruin the experience and usually happens when the wet filling soaks into an underbaked shell. Our recipe avoids this with a crucial step called blind baking. By baking the crust on its own first, you create a firm, golden barrier that can easily hold the rich lemon curd without becoming soft.
Runny Filling
A filling that does not set is a common worry, and it almost always means the curd did not get thick enough on the stovetop. The mixture must reach the right temperature for the eggs to set properly.. The best way to check is with the spoon test. When the lemon curd is thick enough to coat the back of a spoon and holds a clean line when you swipe your finger through it, you know it is ready.
Bitter Aftertaste
A perfect lemon tart should be a balance of sweet and tart, never bitter. This unwanted flavor comes from the white pith just underneath the yellow peel of the lemon. When you zest your lemons, rotate the fruit so you only remove the colorful, fragrant peel. This ensures you get all of the bright lemon oil and none of the bitterness.
Final Thoughts
There is a real sense of accomplishment when you slice into your homemade lemon tart. Seeing that perfect cross-section, with its crisp crust and smooth, glossy filling, is the true reward. This recipe is built with simple techniques that lead directly to that successful moment. You have made a truly wonderful dessert, perfect for sharing at a gathering. And, if you like this dessert, you might want to check our Bento Cake Recipe; it’s another made-easy celebration dessert.
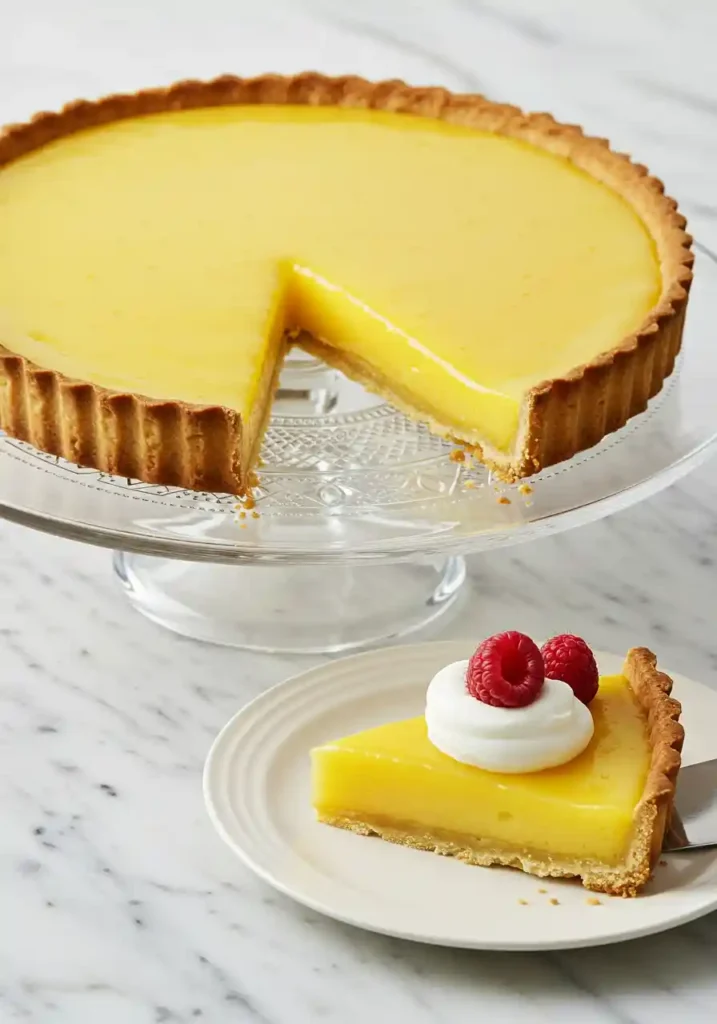
Its golden, fluted crust provides the perfect contrast to the bright and zesty citrus filling.
Your Lemon Tart Questions, Answered
How do I get clean, perfect slices?
The key is patience! Make sure the lemon tart is chilled for 2-4 hours. Use a long, thin, sharp knife, wiping it clean between each cut.
Can I use Meyer lemons for this recipe?
Definitely. Because Meyer lemons are a sweeter, less acidic variety, simply use a little less sugar in the filling to achieve that perfect sweet-tart taste.
Can you make tarts the day before?
Yes, it’s ideal for making in advance. The tart will keep for up to 3 days in the refrigerator, and the flavors are often even better on day two.
What’s the best way to garnish this tart?
Keep it simple to let the lemon flavor shine. A light dusting of powdered sugar just before serving is classic. For a touch of color and freshness, a few raspberries or a dollop of unsweetened whipped cream are perfect companions.
What’s the best make-ahead strategy for this lemon tart?
Yes, you can prepare both components separately. The baked tart shell keeps for two days in an airtight container at room temperature, while the lemon curd can be refrigerated for three days. This makes the final assembly and 10-minute bake incredibly quick.
How should I store leftover lemon tart?
Refrigeration is essential. Since the filling is an egg and cream-based custard, the tart must be kept chilled for food safety and to maintain its perfect texture. Cover it well, and it will remain delicious in the fridge for up to 4 days.
Can this lemon tart be frozen?
It freezes beautifully! For the best results, I recommend slicing the tart after it has chilled completely. Wrap each slice securely in plastic wrap, then a layer of foil. This prevents freezer burn. To enjoy, simply thaw a slice overnight in the refrigerator.

3 thoughts on “My Best Lemon Tart Recipe”